Sequence Programming for VCXG Dual Shutter Operation
Software example Baumer GAPI v2.8.0
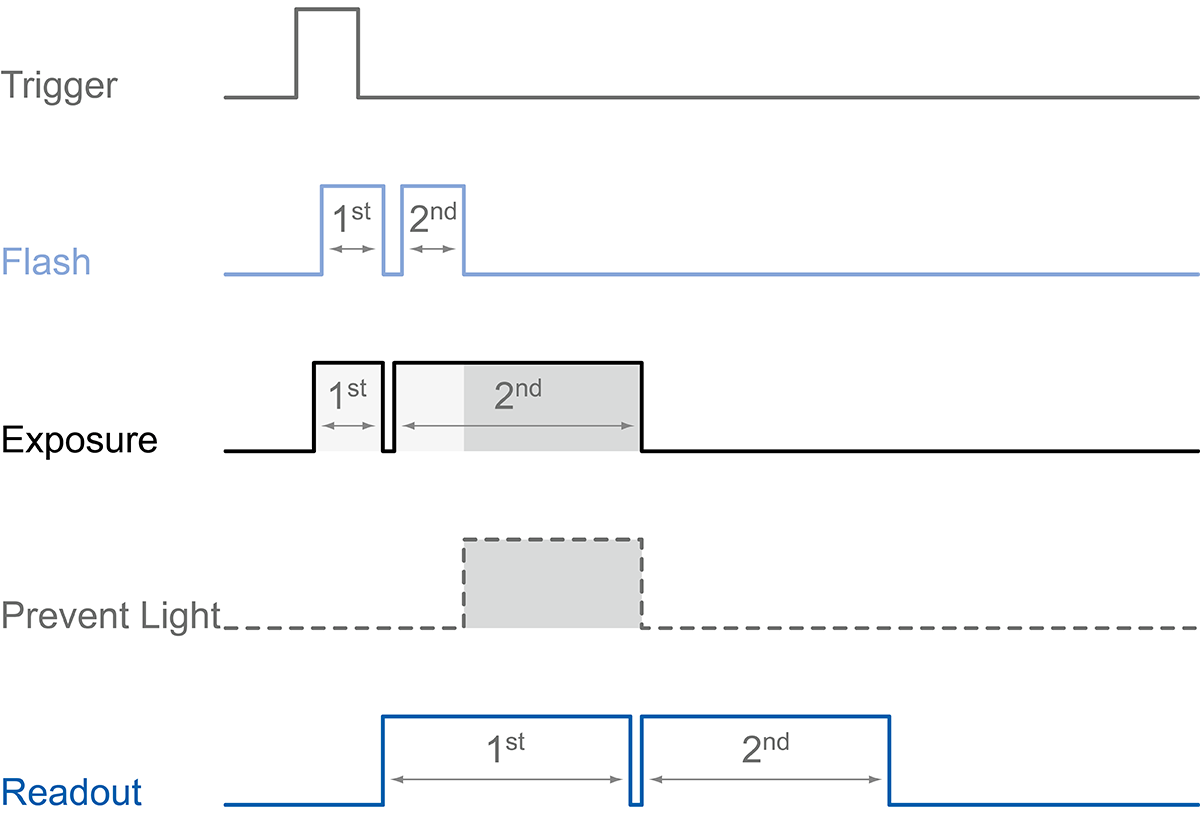
This example explains how to program a sequencer for double curtain triggered via a hardware trigger. Double curtain aims to obtain 2 images in a very short period of time. It uses a special technique to capture the second image while the first image is read from the camera.
If you want to know more about what to do with the sequencer or when you should use double curtain, you can refer to the application notes below and your camera's user manual.
The figure shows the resulting double shot as signal curves: Avoiding unwanted light (gray shaded area in the exposure signal) in the last part of the 2nd exposure results in the camera operating as desired.
                // STOP AUQUISITION AND LOAD DEFAULT PARAMETERS
pDevice->GetRemoteNode("AcquisitionStop")->Execute();
pDevice->GetRemoteNode("UserSetSelector")->SetString("Default");
pDevice->GetRemoteNode("UserSetLoad")->Execute();

//CONFIGURE HARDWARE TRIGGER INPUT
// this needs to be done before the sequencer is configured
pDevice->GetRemoteNode("TriggerMode")->SetString("On");
pDevice->GetRemoteNode("TriggerSource")->SetString("Line0");
pDevice->GetRemoteNode("TriggerActivation")->SetString("RisingEdge");
pDevice->GetRemoteNode("TriggerDelay")->SetDouble(0.0);
pDevice->GetRemoteNode("LineSelector")->SetString("Line0");
pDevice->GetRemoteNode("LineInverter")->SetBool(false);
pDevice->GetRemoteNode("LineDebouncerHighTimeAbs")->SetDouble(1.0);
pDevice->GetRemoteNode("LineDebouncerLowTimeAbs")->SetDouble(1.0);

//CONFIGURE TIMER FOR FLASH
// the timer is started on each exposure start for a duration of 100 µsec
pDevice->GetRemoteNode("TimerSelector")->SetString("Timer1");
pDevice->GetRemoteNode("TimerTriggerSource")->SetString("ExposureStart");
pDevice->GetRemoteNode("TimerTriggerActivation")->SetString("RisingEdge");
pDevice->GetRemoteNode("TimerDelay")->SetDouble(0.0);
// TimerDuration (of Flash) equals Set0 ExposureTime below
pDevice->GetRemoteNode("TimerDuration")->SetDouble(100.0); //100.0 µsec

//CONFIGURE GPIO “Line3” FOR FLASH CONTROL
pDevice->GetRemoteNode("LineSelector")->SetString("Line3");
pDevice->GetRemoteNode("LineSource")->SetString("Timer1Active"); // Line3 is high while Timer1 set up before is active
pDevice->GetRemoteNode("LineInverter")->SetBool(false);

// SWITCH TO SEQUENCER CONFIG MODE
pDevice->GetRemoteNode("SequencerConfigurationMode")->SetString("On");

// SET 0 (FIRST STEP OF THE SEQUENCE)
pDevice->GetRemoteNode("SequencerSetSelector")->SetInt(0);
pDevice->GetRemoteNode("SequencerSetLoad")->Execute();

pDevice->GetRemoteNode("TriggerMode")->SetString("On");
pDevice->GetRemoteNode("OffsetX")->SetInt(0);
pDevice->GetRemoteNode("OffsetY")->SetInt(0);
pDevice->GetRemoteNode("Width")->SetInt(320);
pDevice->GetRemoteNode("Height")->SetInt(240);
pDevice->GetRemoteNode("OffsetX")->SetInt(160);
pDevice->GetRemoteNode("OffsetY")->SetInt(120);
// ExposureTime of Set0 = TimerDuration (of Flash)
pDevice->GetRemoteNode("ExposureTime")->SetDouble(100.0); // 100 µsec

pDevice->GetRemoteNode("SequencerPathSelector")->SetInt(0);
pDevice->GetRemoteNode("SequencerTriggerSource")->SetString("ExposureActive");
pDevice->GetRemoteNode("SequencerTriggerActivation")->SetString("RisingEdge");
//next sequencer step will be Set1 set up below
pDevice->GetRemoteNode("SequencerSetNext")->SetInt(1);

pDevice->GetRemoteNode("SequencerSetSave")->Execute();

// SET 1 (SECOND STEP OF THE SEQUENCE)
pDevice->GetRemoteNode("SequencerSetSelector")->SetInt(1);
pDevice->GetRemoteNode("SequencerSetLoad")->Execute();
// the TriggerMode is set to Off, otherwise the camera would wait for the next hardware trigger which is not desired. Changing TriggerMode to Off will return the camera to free run mode, after one exposure we will be back in Set0 where the TriggerMode is switched On again in order for the camera to wait for the next hardware trigger.
pDevice->GetRemoteNode("TriggerMode")->SetString("Off");
pDevice->GetRemoteNode("OffsetX")->SetInt(0);
pDevice->GetRemoteNode("OffsetY")->SetInt(0);
pDevice->GetRemoteNode("Width")->SetInt(320);
pDevice->GetRemoteNode("Height")->SetInt(240);
pDevice->GetRemoteNode("OffsetX")->SetInt(160);
pDevice->GetRemoteNode("OffsetY")->SetInt(120);
// here is the Double Shutter trick, for this second exposure we set the exposure time to
// the same time as the ReadOutTime of the first image (as calculated by the camera). the
// camera will recognize that the second image will be ready for ReadOut only after the
// ReadOut of the first image is finished and therefore start the exposure straight away
// instead of waiting for the first image to finish ReadOut
bo_double fReadOutTime_Set1 = (bo_double)pDevice->GetRemoteNode("ReadOutTime")->GetInt();
pDevice->GetRemoteNode("ExposureTime")->SetDouble(fReadOutTime_Set1);
pDevice->GetRemoteNode("SequencerPathSelector")->SetInt(0);
pDevice->GetRemoteNode("SequencerTriggerSource")->SetString("ExposureActive");
pDevice->GetRemoteNode("SequencerTriggerActivation")->SetString("RisingEdge");
//next sequencer step will be Step0 again
pDevice->GetRemoteNode("SequencerSetNext")->SetInt(0);
pDevice->GetRemoteNode("SequencerSetSave")->Execute();
//Start with the Set0
pDevice->GetRemoteNode("SequencerSetStart")->SetInt(0);

// SEQUENCER CONFIG END
pDevice->GetRemoteNode("SequencerConfigurationMode")->SetString("Off");

// START CAMERA SEQUENCER
pDevice->GetRemoteNode("SequencerMode")->SetString("On");
pDataStream->StartAcquisitionContinuous();
pDevice->GetRemoteNode("AcquisitionStart")->Execute();

// CAPTURE IMAGES

// STOP CAMERA SEQUENCER
pDevice->GetRemoteNode("AcquisitionStop")->Execute();
pDataStream->StopAcquisition();
pDevice->GetRemoteNode("SequencerMode")->SetString("Off");
// STOP AUQUISITION AND LOAD DEFAULT PARAMETERSmDevice.RemoteNodeList["AcquisitionStop"].Execute();
mDevice.RemoteNodeList["UserSetSelector"].Value = "Default";
mDevice.RemoteNodeList["UserSetLoad"].Execute();//CONFIGURE HARDWARE TRIGGER INPUT// this needs to be done before the sequencer is configured
mDevice.RemoteNodeList["TriggerMode"].Value = "On";
mDevice.RemoteNodeList["TriggerSource"].Value = "Line0";
mDevice.RemoteNodeList["TriggerActivation"].Value = "RisingEdge";
mDevice.RemoteNodeList["TriggerDelay"].Value = (double)0.0;
mDevice.RemoteNodeList["LineSelector"].Value = "Line0";
mDevice.RemoteNodeList["LineInverter"].Value = false;
mDevice.RemoteNodeList["LineDebouncerHighTimeAbs"].Value = (double)1.0;
mDevice.RemoteNodeList["LineDebouncerLowTimeAbs"].Value = (double)1.0;//CONFIGURE TIMER FOR FLASH// the timer is started on each exposure start for a duration of 100 µsec
mDevice.RemoteNodeList["TimerSelector"].Value = "Timer1";
mDevice.RemoteNodeList["TimerTriggerSource"].Value = "ExposureStart";
mDevice.RemoteNodeList["TimerTriggerActivation"].Value = "RisingEdge";
mDevice.RemoteNodeList["TimerDelay"].Value = (double)0.0;
// TimerDuration (of Flash) equals Set0 ExposureTime below
mDevice.RemoteNodeList["TimerDuration"].Value = (double)100.0; // 100.0 µsec//CONFIGURE GPIO “Line3” FOR FLASH CONTROLmDevice.RemoteNodeList["LineSelector"].Value = "Line3";
mDevice.RemoteNodeList["LineSource"].Value = "Timer1Active"; // Line3 is high while Timer1 set up before is active
mDevice.RemoteNodeList["LineInverter"].Value = false;// SWITCH TO SEQUENCER CONFIG MODEmDevice.RemoteNodeList["SequencerConfigurationMode"].Value = "On";// SET 0 (FIRST STEP OF THE SEQUENCE)mDevice.RemoteNodeList["SequencerSetSelector"].Value = (long)0;
mDevice.RemoteNodeList["SequencerSetLoad"].Execute();

mDevice.RemoteNodeList["TriggerMode"].Value = "On";
mDevice.RemoteNodeList["OffsetX"].Value = (long)0;
mDevice.RemoteNodeList["OffsetY"].Value = (long)0;
mDevice.RemoteNodeList["Width"].Value = (long)320;
mDevice.RemoteNodeList["Height"].Value = (long)240;
mDevice.RemoteNodeList["OffsetX"].Value = (long)160;
mDevice.RemoteNodeList["OffsetY"].Value = (long)120;
// ExposureTime of Set0 = TimerDuration (of Flash)
mDevice.RemoteNodeList["ExposureTime"].Value = (double)100.0; // 100 µsec

mDevice.RemoteNodeList["SequencerPathSelector"].Value = (long)0;
mDevice.RemoteNodeList["SequencerTriggerSource"].Value = "ExposureActive";
mDevice.RemoteNodeList["SequencerTriggerActivation"].Value = "RisingEdge";
//next sequencer step will be Set1 set up below
mDevice.RemoteNodeList["SequencerSetNext"].Value = (long)1;

mDevice.RemoteNodeList["SequencerSetSave"].Execute();// SET 1 (SECOND STEP OF THE SEQUENCE)mDevice.RemoteNodeList["SequencerSetSelector"].Value = (long)1;
mDevice.RemoteNodeList["SequencerSetLoad"].Execute();
// the TriggerMode is set to Off, otherwise the camera would wait for the next hardware trigger which is not desired. Changing TriggerMode to Off will return the camera to free run mode, after one exposure we will be back in Set0 where the TriggerMode is switched On again in order for the camera to wait for the next hardware trigger.
mDevice.RemoteNodeList["TriggerMode"].Value = "Off";
mDevice.RemoteNodeList["OffsetX"].Value = (long)0;
mDevice.RemoteNodeList["OffsetY"].Value = (long)0;
mDevice.RemoteNodeList["Width"].Value = (long)320;
mDevice.RemoteNodeList["Height"].Value = (long)240;
mDevice.RemoteNodeList["OffsetX"].Value = (long)160;
mDevice.RemoteNodeList["OffsetY"].Value = (long)120;
// here is the Double Shutter trick, for this second exposure we set the exposure time to
// the same time as the ReadOutTime of the first image(as calculated by the camera). the
// camera will recognize that the second image will be ready for ReadOut only after the
// ReadOut of the first image is finished and therefore start the exposure straight away
// instead of waiting for the first image to finish ReadOut
double fReadOutTime_Set1 = (double)((long)mDevice.RemoteNodeList["ReadOutTime"].Value);
mDevice.RemoteNodeList["ExposureTime"].Value = (double)fReadOutTime_Set1;

mDevice.RemoteNodeList["SequencerPathSelector"].Value = (long)0;
mDevice.RemoteNodeList["SequencerTriggerSource"].Value = "ExposureActive";
mDevice.RemoteNodeList["SequencerTriggerActivation"].Value = "RisingEdge";
// Next sequencer step will be Step0 again
mDevice.RemoteNodeList["SequencerSetNext"].Value = (long)0;
mDevice.RemoteNodeList["SequencerSetSave"].Execute();
//Start with the Set0
mDevice.RemoteNodeList["SequencerSetStart"].Value = (long)0;// SEQUENCER CONFIG ENDmDevice.RemoteNodeList["SequencerConfigurationMode"].Value = "Off";// START CAMERA SEQUENCERmDevice.RemoteNodeList["SequencerMode"].Value = "On";
mDataStream.StartAcquisition();
mDevice.RemoteNodeList["AcquisitionStart"].Execute();// CAPTURE IMAGES

// STOP CAMERA SEQUENCERmDevice.RemoteNodeList["AcquisitionStop"].Execute();
mDataStream.StopAcquisition();
mDevice.RemoteNodeList["SequencerMode"].Value = "Off";
Downloads
Software Examples
Sequencer programming for VCXG dual shutter operation